Sunday, March 4, 2018

"Interactive Drawings" - 8th grade


This is a fun drawing activity that I did with my 8th grade students.  This is great for a one day activity.
So I've seen drawings like this on Pinterest and decided to give it a go.  It's fun!  I asked the kids to choose at least one object and draw an image that includes the object as part of the overall image.
For grading purposes, I set up my Ipad on a stand and made a small photo "center". When they finished they took their work to that area, set up their drawing and object, and took a photo!  Easy peasy!

I added on to this lesson by also having them choose another object, but this time draw the object - but transform it.  For example, a cellphone could become a skating rink....a pair of scissors becomes a creature...etc.  Basically like the first one, but more drawing involved.  This is a follow up of our introduction to Still Life drawing.


Collage Project 8th grade

I saw something similar to this while searching for collage ideas.  I used it at the beginning of the year because I wanted to start with something I was pretty sure they could all be successful with - especially for those that have no art background.
They were allowed to use an image of their choice.  Those that chose to use a photo of themselves were my favorite.  It's amazing how much the end result actually looks like them -- even without facial feature details!
They shared their image with me via Google Docs or email.  I projected the image onto the front whiteboard, they taped up a large piece of cardboard, and traced the important lines and shapes.  From there they looked through magazines to try and find the same type of colors and values as in their image.  This could be a challenge, but it worked out very well.  Some kids worked by themselves, others alone.  It took about a week and a half to complete.  One of my favorites!!


Still Life - Part 2

After practicing with the marshmallows, we then looked at actual objects.  We discussed the shapes and forms we see and how they can be used to help start the drawing of their objects.  I've collected a variety of objects and just put them out on a counter.  They are asked to pick at least 3.  To start, I have them draw each object - by itself.  Once those are finished, they have to put the objects in to one arrangement and draw it as they see it.  This tends to take more than one day, so it's a good idea to let them take a photo of what they set up so they can arrange it again the next day.
It seems to work well!

The final project involves having them bring in at least four items of their own.  This adds a nice personal touch and also allows for discussion on how this could be similar to a self-portrait.  They were also asked to title their work.  Many kids brought in random items and others brought in a theme of objects (such as items related to a sport that they play, toys from their younger years, etc.)


Still Life Drawings - 8th Grade

Still Life drawing can be boring --- however, I've found a "new" way to keep my kids interested!
The secret to my success.....marshmallows!  Such an easy way to introduce the idea and keep their interest.  Bonus, they are excited to eat the marshmallows when they're done.  ;)
I like this because it's a nice way to have them attempt drawing an object sitting in front of them without too much detail and stress.
We first review how to draw a simple cylinder.  I demonstrate via a document camera and they follow along.  We also practice shading.  All of this is done with low lighting in the room.
Next, each student is given a paper placemat and some large and small marshmallows.  They are asked to set up at least four different arrangements with their marshmallows and draw them - shading included!


I'm back!

I have been away from my blog for a long time -- too long!  I'm going to do my best to keep it updated.   :)


Sunday, January 5, 2014

Clay Stamps

I have not made clay stamps with my classes before -- we'll see how it goes!
The idea is to have the kids use their stamps on a sculpture that we will be making in a few months.
They seemed to really like the idea.

I began by showing a view video clips -- showing examples of how clay stamps work.  
Using my document camera, I demonstrated how to create a "roller" stamp (which helped me to introduce the term "slab") and then how to create a stamp with a handle. 


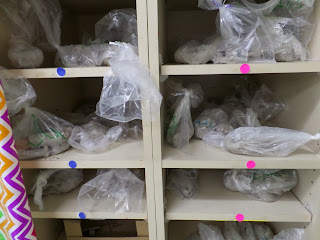
I took this photo to show how we stored and organized our projects. I had four classes doing this and wanted to keep them sorted by hour.  I used to put their names on the shelves, display a list, etc. but that ends up being extra work I don't have time for.  This time I had some colorful dot stickers and placed them on the shelves (as you can see in the photo).  1st hour was blue, 2nd hour pink, and so forth.  It worked out well!
Also, to help reduce the temptation of touching other kids' work while on the shelves, I covered the shelves (except for the current hour that was working) with a $1.00 plastic table cloth from Wal-Mart.  Worked like a charm!


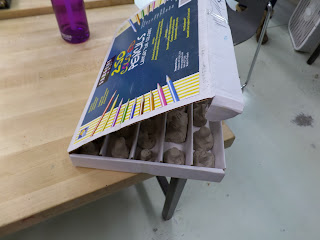
I always save boxes -- especially the marker and colored pencil ones.  These are GREAT for keeping things organized.  I use them to help keep my pastels and inkwells sorted.
Luckily, I had a few to help store the stamps as they dry!!


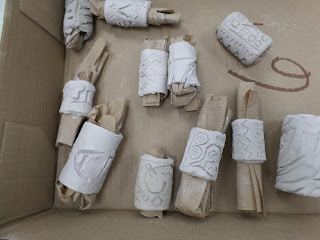
A few "roller" stamps

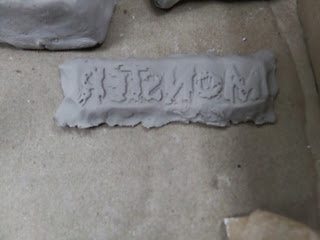
This one was made with the student pressing in a bracelet that they were wearing.
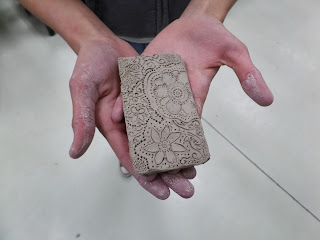
I did encourage them to use a variety of tools -- this opened up a new view on creating textures with everyday items.
We used pens, coins, bottle caps, etc.


A "roller" stamp design.  Students were instructed to roll out a slab of clay & cut out a rectangular shape (about 2"x 4" I think...)
Then, they carved, pressed in, added to, etc. to create a design.
Using paper towel to help hold it's shape, the stamp was rolled, slipped and scored and complete!


Fun!!

Micrography Lesson 2013-14

 I started them out with a Thinking Map activity.  This worked well as it helped them to brainstorm a lot of words for their picture.  This is something that they referred to quite often as they worked.

 Using a transparency (or "extra/leftover" pieces of laminating sheets from the library) and vis-a-vis, students outlined their image.


 The outlined picture was placed on top of a white sheet of paper, then underneath their "final drawing paper".  The white paper underneath the transparency helped it to be more visible, even though my tables aren't necessarily dark in color.

If you look close, you can see the outlined picture underneath.
She kept her photo nearby to help with the details, and more importantly, different areas of value.


Work in progress